
Making buttonholes is something sewing enthusiasts never look forward to. Buttonholes are tiny and it’s a bit tricky to twist-sew on an old machine, asides from that, it is also a time-consuming chore. However, there are fast and simple ways of sewing a buttonhole and once you get the knack for it, you’ll find that it is not as hard as it appears.
This article is a simple step-by-step guide on how to make a buttonhole with any basic sewing machine. And if you have a high-tech sewing machine, then making buttonholes is child’s play. All you need to do is to follow these seven simple steps and you’ll be on your way to making perfect buttonholes.
To sew a buttonhole, you first need to know the measurement of the button you intend to use. You also need to know the exact position where you intend to fix it. So, whether you want to use a half-inch round button (diameter) or an asymmetrical shape button with its widest width of half an inch, you have to make your buttonhole size a half-inch. This is minus the top and bottom finished ends.
Making Buttonholes: Step-by-Step Instructions
- Measure and mark the 1/2″ measurement (we are using a half-inch diameter button as our example) exactly where you want the button to be placed. The centre line of the cut hole must correspond with the centre line of your button.
- Use a chalk pencil to make your markings and make sure your measurements are exact. Many sewing machines have a buttonhole setting but if yours doesn’t come with one, you can use the following method to make a buttonhole.
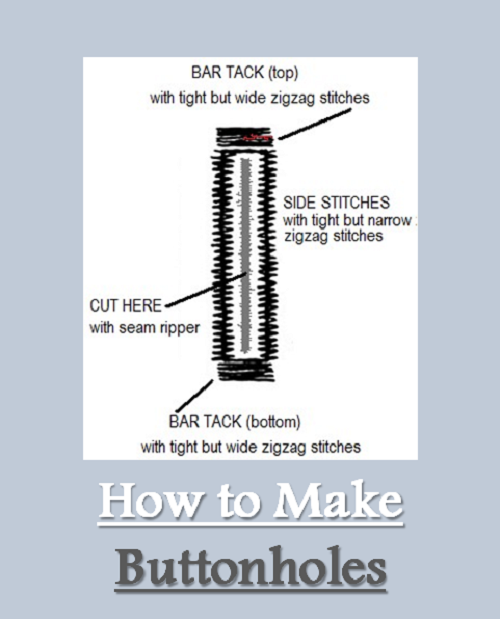
- Use the zigzag function of your machine to mark a “bar tack”. A bar tack is made by using a wide zigzag stitch to sew stitches back and forth a few times in place on the fabric. These bar tacks are sewn at the top and bottom of the buttonhole, but the first one you should start with is the one at the top end of the buttonhole position. The bar tack is made with tight and wide stitching.
- Set your machine’s zigzag function to a narrow and tight stitch and sew the first side of the hole. Go down this side till you reach the other end of the buttonhole.
- Repeat the tight wide bar tack stitches at the bottom as you did the top bar tack.
- Reset your machine to give you a tight narrow zigzag and then sew your narrow stitches up the second side of the buttonhole to complete the function.
- Lock the stitches in place by setting your stitch width to zero. Sew a few stitches to finish your buttonhole.
After this, carefully make a cut in the middle of the buttonhole with a seam ripper. That’s it!
Customer Data and Sewing Measurements Workbook for Dressmakers